当我们安装主题和插件时,都会向…
我在WordPress 3.9中最喜欢的更新之一是使TinyMCE版本4.0成为核心。新的TinyMCE看起来更干净(确实与WP仪表板匹配),并且具有一些非常好的附加功能。我的许多旧主题和插件都必须进行更新才能与新的TinyMCE配合使用,因此我花了一些时间来研究API并找出一些很酷的东西。下面,我将为您提供一些示例,说明如何扩展TinyMCE的功能。我不会逐步介绍所有步骤或代码的确切含义(这是针对开发人员的),但将为您提供可以复制/粘贴到主题或插件中,然后进行相应调整的确切代码。
添加字体大小和字体系列选择
默认情况下,“自定义字体”和“字体大小”不会添加到TinyMCE编辑器中。下面的函数会将这两个下拉列表添加到第二行编辑器的最左侧。如果需要在另一行中简单地更改“ mce_buttons_2”的位置(例如:在第三行中使用“ mce_buttons_3”)。
// Enable font size & font family selects in the editor
if ( ! function_exists( 'wpex_mce_buttons' ) ) {
	function wpex_mce_buttons( $buttons ) {
		array_unshift( $buttons, 'fontselect' ); // Add Font Select
		array_unshift( $buttons, 'fontsizeselect' ); // Add Font Size Select
		return $buttons;
	}
}
add_filter( 'mce_buttons_2', 'wpex_mce_buttons' );
添加自定义字体大小
默认情况下,字体大小设置为pt值,这并不总是理想的。我更喜欢使用像素值(12px,13px,14px,16px..etc),并提供更多的选项,以实现更大的灵活性。下面的功能将更改下拉选择器中的默认字体大小选项。
// Customize mce editor font sizes
if ( ! function_exists( 'wpex_mce_text_sizes' ) ) {
	function wpex_mce_text_sizes( $initArray ){
		$initArray['fontsize_formats'] = "9px 10px 12px 13px 14px 16px 18px 21px 24px 28px 32px 36px";
		return $initArray;
	}
}
add_filter( 'tiny_mce_before_init', 'wpex_mce_text_sizes' );
添加自定义字体
默认情况下,字体系列选择器中的默认字体选项均为“网络安全”字体,但是如果要向选择器中添加更多字体怎么办?也许一些Google字体?我们来看下面的例子真的很容易。
// Add custom Fonts to the Fonts list
if ( ! function_exists( 'wpex_mce_google_fonts_array' ) ) {
	function wpex_mce_google_fonts_array( $initArray ) {
	    $initArray['font_formats'] = 'Lato=Lato;Andale Mono=andale mono,times;Arial=arial,helvetica,sans-serif;Arial Black=arial black,avant garde;Book Antiqua=book antiqua,palatino;Comic Sans MS=comic sans ms,sans-serif;Courier New=courier new,courier;Georgia=georgia,palatino;Helvetica=helvetica;Impact=impact,chicago;Symbol=symbol;Tahoma=tahoma,arial,helvetica,sans-serif;Terminal=terminal,monaco;Times New Roman=times new roman,times;Trebuchet MS=trebuchet ms,geneva;Verdana=verdana,geneva;Webdings=webdings;Wingdings=wingdings,zapf dingbats';
            return $initArray;
	}
}
add_filter( 'tiny_mce_before_init', 'wpex_mce_google_fonts_array' );
请注意,我是如何在上面的代码中将“ Lato”添加到列表中的?就这么简单!在我的WordPress总主题中,我实际上遍历了主题面板中定义的网站上使用的任何自定义字体,并将它们添加到选择框中,以便在编辑帖子/页面(甜)时也可以使用它们。但是该代码仅将字体家族添加到下拉列表中,因此不会神奇地加载脚本,因此当您在编辑器中更改文本时,您实际上可以看到对其应用了自定义字体……这就是下面的代码!
// Add Google Scripts for use with the editor
if ( ! function_exists( 'wpex_mce_google_fonts_styles' ) ) {
	function wpex_mce_google_fonts_styles() {
	   $font_url = 'http://fonts.googleapis.com/css?family=Lato:300,400,700';
           add_editor_style( str_replace( ',', '%2C', $font_url ) );
	}
}
add_action( 'init', 'wpex_mce_google_fonts_styles' );
启用格式(样式)下拉菜单并添加新样式
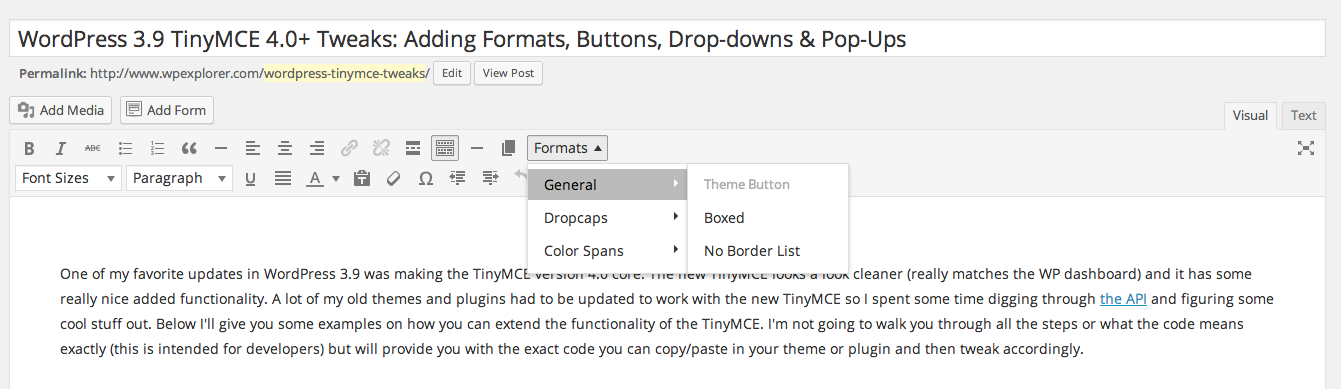
还记得WP 3.8中的“样式”下拉列表吗?太酷了!您可以使用它来添加一些很酷的类,以便在帖子编辑器中使用(我实际上在WPExplorer上将其用于按钮,彩色范围,框等)。我们将在WP 3.9中仍然可以添加样式,但是,在新的TinyMCE 4.0中将其重命名为“格式”,因此它的工作方式略有不同。以下是如何启用格式下拉菜单以及如何向其中添加一些新项目的示例。
启用格式下拉菜单
实际上,这是在WP 3.9之前以相同的方式完成的,但是如果您不知道如何做,我可以分享。
// Add Formats Dropdown Menu To MCE
if ( ! function_exists( 'wpex_style_select' ) ) {
	function wpex_style_select( $buttons ) {
		array_push( $buttons, 'styleselect' );
		return $buttons;
	}
}
add_filter( 'mce_buttons', 'wpex_style_select' );
将新项目添加到格式
添加新项目非常容易。请注意我如何添加“ $ settings [‘style_formats_merge’] = true;” 在下面的代码中,这可以确保您所做的编辑以及其他所有内容都添加到了格式下拉菜单中-不要覆盖整个内容(也许其他插件也希望使用它)。
// Add new styles to the TinyMCE "formats" menu dropdown
if ( ! function_exists( 'wpex_styles_dropdown' ) ) {
	function wpex_styles_dropdown( $settings ) {

		// Create array of new styles
		$new_styles = array(
			array(
				'title'	=> __( 'Custom Styles', 'wpex' ),
				'items'	=> array(
					array(
						'title'		=> __('Theme Button','wpex'),
						'selector'	=> 'a',
						'classes'	=> 'theme-button'
					),
					array(
						'title'		=> __('Highlight','wpex'),
						'inline'	=> 'span',
						'classes'	=> 'text-highlight',
					),
				),
			),
		);

		// Merge old & new styles
		$settings['style_formats_merge'] = true;

		// Add new styles
		$settings['style_formats'] = json_encode( $new_styles );

		// Return New Settings
		return $settings;

	}
}
add_filter( 'tiny_mce_before_init', 'wpex_styles_dropdown' );
添加一个简单的MCE按钮
将新按钮添加到TinyMCE编辑器对于短代码特别有用,因为作为用户,您不必记住任何短代码,您只需单击按钮即可将其插入。我并不是说要为您的所有短代码添加100个按钮到TinyMCE(我讨厌开发人员这样做时,这是一种不好的做法,看起来很可怕),但是如果您添加1个或几个按钮,我会让它通过的。要添加一束,则应创建一个子菜单,如以下部分所述。

PHP代码–在WP中声明新的MCE插件
此代码将声明您的新MCE插件,请务必更改javascript文件“ mce-button.js”的位置以匹配文件的位置(在下一部分中,我还将为您提供代码)很明显,将前缀“ my”重命名为更独特的名称!
// Hooks your functions into the correct filters
function my_add_mce_button() {
	// check user permissions
	if ( !current_user_can( 'edit_posts' ) && !current_user_can( 'edit_pages' ) ) {
		return;
	}
	// check if WYSIWYG is enabled
	if ( 'true' == get_user_option( 'rich_editing' ) ) {
		add_filter( 'mce_external_plugins', 'my_add_tinymce_plugin' );
		add_filter( 'mce_buttons', 'my_register_mce_button' );
	}
}
add_action('admin_head', 'my_add_mce_button');

// Declare script for new button
function my_add_tinymce_plugin( $plugin_array ) {
	$plugin_array['my_mce_button'] = get_template_directory_uri() .'/js/mce-button.js';
	return $plugin_array;
}

// Register new button in the editor
function my_register_mce_button( $buttons ) {
	array_push( $buttons, 'my_mce_button' );
	return $buttons;
}
JS代码–将按钮添加到MCE
该js代码进入“ symple_shortcodes_add_tinymce_plugin”函数中上面代码段中注册的js文件中。这应该在编辑器中添加一个新文本按钮,显示“ New Button”,单击该按钮将插入文本“ WPExplorer.com很棒!” (当然)。
(function() {
	tinymce.PluginManager.add('my_mce_button', function( editor, url ) {
		editor.addButton('my_mce_button', {
			text: 'New Button',
			icon: false,
			onclick: function() {
				editor.insertContent('WPExplorer.com is awesome!');
			}
		});
	});
})();
将自定义图标添加到新的MCE按钮
上面我向您展示了如何添加一个新按钮,该按钮在编辑器中将显示为“ New Button”,这有点la脚……因此,更改后的代码将向您展示如何添加自己的自定义图标。
用CSS加载样式表
使用此功能加载新样式表以供您在管理面板中使用-一些插件/主题可能已经添加了样式表,因此,如果您的主题/插件正在这样做,则跳过此步骤,只需添加自定义CSS并调整js(如下所示) 。
function my_shortcodes_mce_css() {
	wp_enqueue_style('symple_shortcodes-tc', plugins_url('/css/my-mce-style.css', __FILE__) );
}
add_action( 'admin_enqueue_scripts', 'my_shortcodes_mce_css' );
您的自定义CSS
这是添加以前加载的样式表的CSS。
i.my-mce-icon {
	background-image: url('YOUR ICON URL');
}
调整您的Javascript
现在,简单地调整您之前添加的javascript以删除text参数,而不是将图标设置为false即可为其提供自定义类名。
(function() {
	tinymce.PluginManager.add('my_mce_button', function( editor, url ) {
		editor.addButton( 'my_mce_button', {
			icon: 'my-mce-icon',
			onclick: function() {
				editor.insertContent('WPExplorer.com is awesome!');
			}
		});
	});
})();
使用子菜单添加按钮
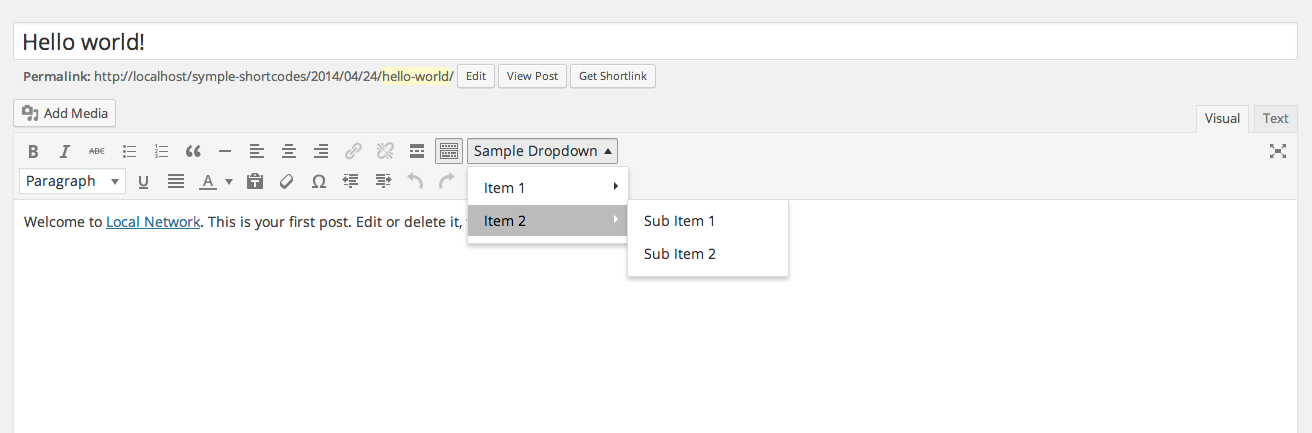
早些时候,我提到在TinyMCE栏上添加大量新图标是一个坏主意(确实如此),因此请查看下面的代码以查看如何编辑javascript以显示自定义按钮的子菜单。如果您想观看它,请查看我的Symple简码视频。
(function() {
tinymce.PluginManager.add('my_mce_button', function( editor, url ) {
editor.addButton( 'my_mce_button', {
text: 'Sample Dropdown',
icon: false,
type: 'menubutton',
menu: [
{
text: 'Item 1',
menu: [
{
text: 'Sub Item 1',
onclick: function() {
editor.insertContent('WPExplorer.com is awesome!');
}
},
{
text: 'Sub Item 2',
onclick: function() {
editor.insertContent('WPExplorer.com is awesome!');
}
}
]
},
{
text: 'Item 2',
menu: [
{
text: 'Sub Item 1',
onclick: function() {
editor.insertContent('WPExplorer.com is awesome!');
}
},
{
text: 'Sub Item 2',
onclick: function() {
editor.insertContent('WPExplorer.com is awesome!');
}
}
]
}
]
});
});
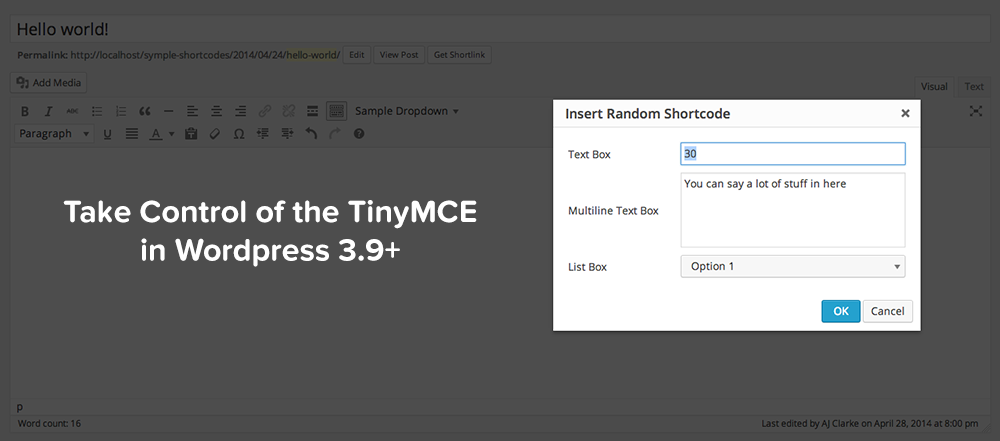
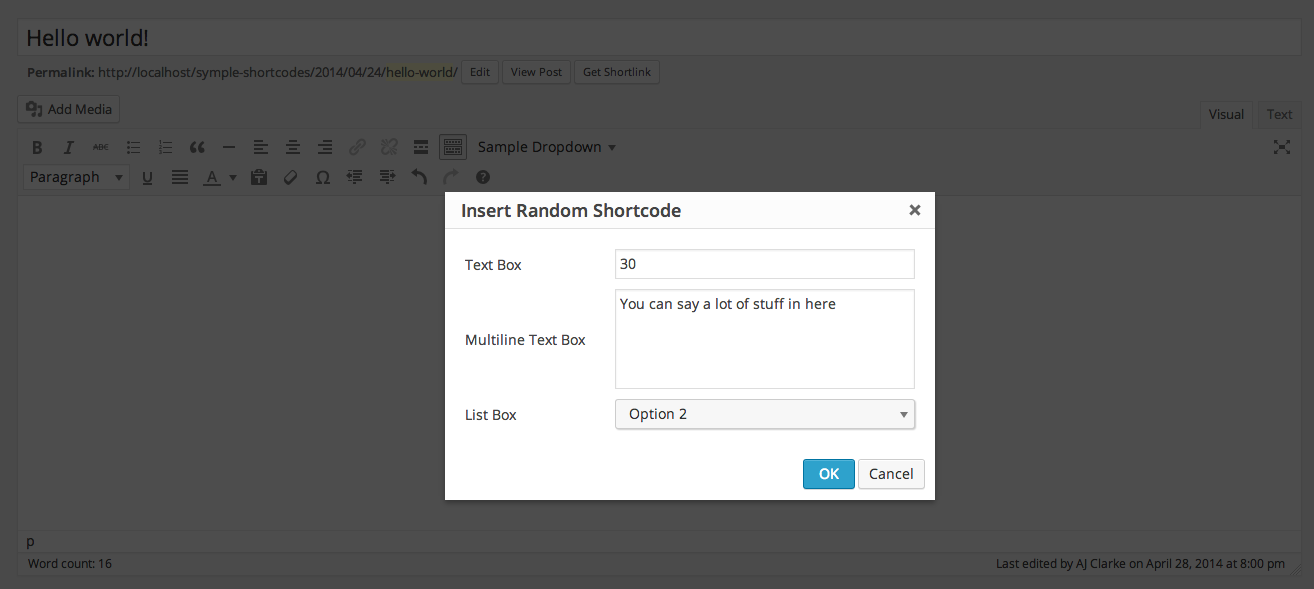
})(); 单击时将弹出窗口添加到您的按钮
在上面的示例中,您可能会注意到,每个按钮都只插入文本“ mac163.com太棒了!” 这很酷,但是如何创建一个弹出窗口,用户可以在其中更改要插入文本的弹出窗口呢?现在那太好了!这是我在Symple简码1.6版中添加的内容,使该插件更加易于使用。
(function() {
	tinymce.PluginManager.add('my_mce_button', function( editor, url ) {
		editor.addButton( 'my_mce_button', {
			text: 'Sample Dropdown',
			icon: false,
			type: 'menubutton',
			menu: [
				{
					text: 'Item 1',
					menu: [
						{
							text: 'Pop-Up',
							onclick: function() {
								editor.windowManager.open( {
									title: 'Insert Random Shortcode',
									body: [
										{
											type: 'textbox',
											name: 'textboxName',
											label: 'Text Box',
											value: '30'
										},
										{
											type: 'textbox',
											name: 'multilineName',
											label: 'Multiline Text Box',
											value: 'You can say a lot of stuff in here',
											multiline: true,
											minWidth: 300,
											minHeight: 100
										},
										{
											type: 'listbox',
											name: 'listboxName',
											label: 'List Box',
											'values': [
												{text: 'Option 1', value: '1'},
												{text: 'Option 2', value: '2'},
												{text: 'Option 3', value: '3'}
											]
										}
									],
									onsubmit: function( e ) {
										editor.insertContent( '[random_shortcode textbox="' + e.data.textboxName + '" multiline="' + e.data.multilineName + '" listbox="' + e.data.listboxName + '"]');
									}
								});
							}
						}
					]
				}
			]
		});
	});
})();
太酷了…现在呢?
好问题!现在是时候进行这些令人敬畏的调整,并创建一些史诗般的内容或更新您的插件/主题以与WordPress 3.9中的新TinyMCE兼容。在下面的评论中让我知道您的想法!

微信扫描二维码联系我们!
我们在微信上24小时期待你的声音
提供外贸路由器设备产品,轻松翻墙,解答:WP主题推荐,WP网站建设,Google SEO,百度SEO,专业服务器环境搭建等!
需要提供WordPress主题/插件的汉化服务可以随时联系我们!另外成品WordPress网站以及半成品WordPress网站建设,海外Google SEO优化托管服务,百度SEO优化托管服务,Centos/Debian服务器WP专用环境搭建,WP缓存服务器搭建,我们都是你的首选,拥有多年WP开源程序服务经验,我们一直在坚持客户体验,没有最好,只有更好!
随机推荐