当我们安装主题和插件时,都会向…

希望您阅读并喜欢主题定制器系列的前两篇文章— WordPress主题定制器简介和与主题定制器交互。现在是时候进入主课程并开始组装您可以在主题中使用的Theme Customizer样板了。这篇文章包含一些长长的代码块,因此请注意内联注释。
注意:如果您只想立即使用样板,则可以从Github下载样板,并通过钩入’thsp_cbp_options_array’过滤器钩子来更改$ options数组中的字段。
我们正在创造什么

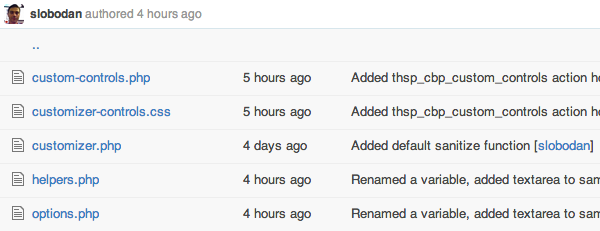
主题定制程序样板目录结构
- customizer.php -这是主要的主题定制样板文件,所述一个,增加了使用数据的部分,设置和控制从选项阵列
- custom-controls.php –自定义控件类和一个动作挂钩,允许您添加自己的自定义控件
- helpers.php –帮助程序函数,用于检索主题选项,选项默认值等。
- options.php –示例选项和过滤器挂钩,可让您编辑options数组并使用自己的字段
- customizer-controls.css –用于图像替换的无线电自定义控件的基本CSS
整个想法是能够将这些文件复制到主题目录中的子目录中,包括来自functions.php的customrizer.php文件,并通过使用主题定制器Boilerplate挂钩更改您喜欢的任何内容,包括尤其是options数组(说明)在第4部分中)。更新:以前,您只需要编辑options.php,但是使用钩子会使事情变得更加整洁。
现在让我们使用一个真实的示例-我们将文本控件添加到新的Theme Customizer部分。该数组放置在辅助函数中,并在返回时对其应用了过滤器。这样,您可以从子主题或插件中添加更多选项。这里是:
/**
 * Helper function that holds array of theme options.
 *
 * @return	array	$options	Array of theme options
 * @uses	thsp_get_theme_customizer_fields()	defined in customizer/helpers.php
 */
function thsp_get_theme_customizer_fields() {

	/*
	 * Using helper function to get default required capability
	 */
	$required_capability = thsp_settings_page_capability();

	$options = array(


		// Section ID
		'new_customizer_section' => array(

			/*
			 * We're checking if this is an existing section
			 * or a new one that needs to be registered
			 */
			'existing_section' => false,
			/*
			 * Section related arguments
			 * Codex - http://codex.wordpress.org/Class_Reference/WP_Customize_Manager/add_section
			 */
			'args' => array(
				'title' => __( 'New Section Title', 'my_theme_textdomain' ),
				'description' => __( 'New section description', 'my_theme_textdomain' ),
				'priority' => 10
			),

			/*
			 * 'fields' array contains all the fields that need to be
			 * added to this section
			 */
			'fields' => array(

				/*
				 * ==========
				 * ==========
				 * Text field
				 * ==========
				 * ==========
				 */
				// Field ID
				'new_text_field' => array(
					/*
					 * Setting related arguments
					 * Codex - http://codex.wordpress.org/Class_Reference/WP_Customize_Manager/add_setting
					 */
					'setting_args' => array(
						'default' => __( 'Default text value', 'my_theme_textdomain' ),
						'type' => 'option',
						'capability' => $required_capability,
						'transport' => 'refresh',
						'sanitize_callback' => 'thsp_sanitize_cb',
					),
					/*
					 * Control related arguments
					 * Codex - http://codex.wordpress.org/Class_Reference/WP_Customize_Manager/add_control
					 */
					'control_args' => array(
						'label' => __( 'New text control label', 'my_theme_textdomain' ),
						'type' => 'text', // Text field control
						'priority' => 1
					)
				)

			)

		),

	);

	/*
	 * 'thsp_customizer_options' filter hook will allow you to
	 * add/remove some of these options from a child theme
	 */
	return apply_filters( 'thsp_customizer_options', $options );

}
更新:数组保持不变,但是现在您也可以将options数组传递给过滤器挂钩,有关更多详细信息,请参见第4部分。
我知道乍一看看起来很复杂,但让我解释一下。
在$选项阵列由段(S)(只有在这种情况下- new_customizer_section),每个部分都有它的参数,字段和一个布尔值(existing_section)来表示,如果它是一个新的部分,或者我们只是增加了一些领域到现有的。参数数组与传递给$ wp_customize-> add_section方法的参数相同。字段数组稍微复杂一些。
更新:控制参数中的choices数组现在是多维数组。
每个字段都包含一个定制程序设置和一个定制程序控件。这就是为什么我们有setting_args和control_args数组的原因。它们与传递给$ wp_customize-> add_setting和$ wp_customize-> add_control方法的参数数组几乎完全相同。唯一的区别是控制参数中的“选择”数组,$ wp_customize-> add_control要求它是一个简单的键=>值对数组,而我们使用的是多维数组。
这样就可以将更多的数据传递给每个选项,因此,例如,如果您在主题中加载Google字体,则可以使用字符串,使您可以在options数组中加载正确的字体。您可以看到使用Customizer Boilerplate的此主题的示例。
因此,如果您已经意识到了这三种方法,那么它们都是非常熟悉的。
添加一个复选框控件几乎是相同的,您只需要在’control_args’数组中将’type’更改为’checkbox’:
/*
 * ==============
 * Checkbox field
 * ==============
 */
'new_checkbox_field' => array(
	'setting_args' => array(
		'default' => true,
		'type' => 'option',
		'capability' => $required_capability,
		'transport' => 'refresh',
		'sanitize_callback' => 'thsp_sanitize_cb',
	),
	'control_args' => array(
		'label' => __( 'New radio control label', 'my_theme_textdomain' ),
		'type' => 'checkbox', // Checkbox field control
		'priority' => 2
	)
),
单选和选择控件几乎相同,您只需要指定给定的选择即可:
/*
 * ===========
 * ===========
 * Radio field
 * ===========
 * ===========
 */
'new_radio_field' => array(
	'setting_args' => array(
		'default' => 'option-2',
		'type' => 'option',
		'capability' => $thsp_cbp_capability,
		'transport' => 'refresh',
	),
	'control_args' => array(
		'label' => __( 'New radio control label', 'my_theme_textdomain' ),
		'type' => 'radio', // Radio control
		'choices' => array(
			'option-1' => array(
				'label' => __( 'Option 1', 'my_theme_textdomain' )
			),
			'option-2' => array(
				'label' => __( 'Option 2', 'my_theme_textdomain' )
			),
			'option-3' => array(
				'label' => __( 'Option 3', 'my_theme_textdomain' )
			)
		),
		'priority' => 3
	)
),

/*
 * ============
 * ============
 * Select field
 * ============
 * ============
 */
'new_select_field' => array(
	'setting_args' => array(
		'default' => 'option-3',
		'type' => 'option',
		'capability' => $thsp_cbp_capability,
		'transport' => 'refresh',
	),
	'control_args' => array(
		'label' => __( 'New select field label', 'my_theme_textdomain' ),
		'type' => 'select', // Select control
		'choices' => array(
			'option-1' => array(
				'label' => __( 'Option 1', 'my_theme_textdomain' )
			),
			'option-2' => array(
				'label' => __( 'Option 2', 'my_theme_textdomain' )
			),
			'option-3' => array(
				'label' => __( 'Option 3', 'my_theme_textdomain' )
			)
		),
		'priority' => 4
	)
)
最后,WordPress中内置了两种复杂的控件类型-文件上传和图片上传:
/*
 * ===========
 * ===========
 * File Upload
 * ===========
 * ===========
 */
'new_file_upload_field' => array(
	'setting_args' => array(
		'default' => '',
		'type' => 'option',
		'capability' => $thsp_cbp_capability,
		'transport' => 'refresh',
	),
	'control_args' => array(
		'label' => __( 'File upload', 'my_theme_textdomain' ),
		'type' => 'upload', // File upload field control
		'priority' => 5
	)
),

/*
 * ============
 * ============
 * Image Upload
 * ============
 * ============
 */
'new_image_upload_field' => array(
	'setting_args' => array(
		'default' => '',
		'type' => 'option',
		'capability' => $thsp_cbp_capability,
		'transport' => 'refresh',
	),
	'control_args' => array(
		'label' => __( 'Image upload', 'my_theme_textdomain' ),
		'type' => 'image', // Image upload field control
		'priority' => 6
	)
)
请注意,我在为所有这些字段设置参数时使用了’type’=>’option’。这将允许所有值作为一个值存储在数据库中。替代方法是’type’=>’theme_mod’,但现在让我们坚持使用’option’。
使用选项数组添加自定义程序部分,设置和控件
如果您不确定如何与WordPress Theme Customizer交互,请检查一下,因为这就是我们现在要做的。唯一的区别是,我们不会一次添加一个部分,设置和控件,而是将使用创建的序列化数组自动执行该过程。让我们跳进去吧:
function thsp_cbp_customize_register( $wp_customize ) {

	/**
	 * Custom controls
	 */
	require( dirname(__FILE__) . '/custom-controls.php' );


	/*
	 * Get all the fields using a helper function
	 */
	$thsp_sections = thsp_cbp_get_fields();


	/*
	 * Get name of DB entry under which options will be stored
	 */
	$thsp_cbp_option = thsp_cbp_option();


	/**
	 * Loop through the array and add Customizer sections
	 */
	foreach( $thsp_sections as $thsp_section_key => $thsp_section_value ) {

		/**
		 * Adds Customizer section, if needed
		 */
		if( ! $thsp_section_value['existing_section'] ) {

			$thsp_section_args = $thsp_section_value['args'];

			// Add section
			$wp_customize->add_section(
				$thsp_section_key,
				$thsp_section_args
			);

		} // end if

		/*
		 * Loop through 'fields' array in each section
		 * and add settings and controls
		 */
		$thsp_section_fields = $thsp_section_value['fields'];
		foreach( $thsp_section_fields as $thsp_field_key => $thsp_field_value ) {

			/*
			 * Check if 'option' or 'theme_mod' is used to store option
			 *
			 * If nothing is set, $wp_customize->add_setting method will default to 'theme_mod'
			 * If 'option' is used as setting type its value will be stored in an entry in
			 * {prefix}_options table. Option name is defined by thsp_cbp_option() function
			 */
			if ( isset( $thsp_field_value['setting_args']['type'] ) && 'option' == $thsp_field_value['setting_args']['type'] ) {
				$setting_control_id = $thsp_cbp_option . '[' . $thsp_field_key . ']';
			} else {
				$setting_control_id = $thsp_field_key;
			}

			/*
			 * Add default callback function, if none is defined
			 */
			if ( ! isset( $thsp_field_value['setting_args']['sanitize_cb'] ) ) {
				$thsp_field_value['setting_args']['sanitize_cb'] = 'thsp_cbp_sanitize_cb';
			}

			/**
			 * Adds Customizer settings
			 */
			$wp_customize->add_setting(
				$setting_control_id,
				$thsp_field_value['setting_args']
			);

			/**
			 * Adds Customizer control
			 *
			 * 'section' value must be added to 'control_args' array
			 * so control can get added to current section
			 */
			$thsp_field_value['control_args']['section'] = $thsp_section_key;

			/*
			 * $wp_customize->add_control method requires 'choices' to be a simple key => value pair
			 */
			if ( isset( $thsp_field_value['control_args']['choices'] ) ) {
				$thsp_cbp_choices = array();
				foreach( $thsp_field_value['control_args']['choices'] as $thsp_cbp_choice_key => $thsp_cbp_choice_value ) {
					$thsp_cbp_choices[$thsp_cbp_choice_key] = $thsp_cbp_choice_value['label'];
				}
				$thsp_field_value['control_args']['choices'] = $thsp_cbp_choices;
			}


			// Check control type
			if ( 'color' == $thsp_field_value['control_args']['type'] ) {
				$wp_customize->add_control(
					new WP_Customize_Color_Control(
						$wp_customize,
						$setting_control_id,
						$thsp_field_value['control_args']
					)
				);
			} elseif ( 'image' == $thsp_field_value['control_args']['type'] ) {
				$wp_customize->add_control(
					new WP_Customize_Image_Control(
						$wp_customize,
						$setting_control_id,
						$thsp_field_value['control_args']
					)
				);
			} elseif ( 'upload' == $thsp_field_value['control_args']['type'] ) {
				$wp_customize->add_control(
					new WP_Customize_Upload_Control(
						$wp_customize,
						$setting_control_id,
						$thsp_field_value['control_args']
					)
				);
			} else {
				$wp_customize->add_control(
					$setting_control_id,
					$thsp_field_value['control_args']
				);
			}

		} // end foreach

	} // end foreach

}
add_action( 'customize_register', 'thsp_cbp_customize_register' );
浏览所有部分,添加尚不存在的部分,然后遍历每个部分中的所有字段,为每个部分添加设置和控件。这就是这里要做的一切。
还记得我们为所有设置使用了’type’=>’option’吗?这就是为什么我们现在对设置和部分都使用“ my_theme_options [$ thsp_field_key]”的原因 。这会将所有值存储为一个序列化数组,您可以使用get_option(’my_theme_options’)进行检索。或者,您可以只使用helpers.php中定义的helper函数来检索所有字段的当前值和默认值:
/**
 * Get Option Values
 *
 * Array that holds all of the options values
 * Option's default value is used if user hasn't specified a value
 *
 * @uses	thsp_get_theme_customizer_defaults()	defined in /customizer/options.php
 * @return	array									Current values for all options
 * @since	Theme_Customizer_Boilerplate 1.0
 */
function thsp_cbp_get_options_values() {

	// Get the option defaults
	$option_defaults = thsp_cbp_get_options_defaults();

	// Parse the stored options with the defaults
	$thsp_cbp_options = wp_parse_args( get_option( thsp_cbp_option(), array() ), $option_defaults );

	// Return the parsed array
	return $thsp_cbp_options;

}


/**
 * Get Option Defaults
 *
 * Returns an array that holds default values for all options
 *
 * @uses	thsp_get_theme_customizer_fields()	defined in /customizer/options.php
 * @return	array	$thsp_option_defaults		Default values for all options
 * @since	Theme_Customizer_Boilerplate 1.0
 */
function thsp_cbp_get_options_defaults() {

	// Get the array that holds all theme option fields
	$thsp_sections = thsp_cbp_get_fields();

	// Initialize the array to hold the default values for all theme options
	$thsp_option_defaults = array();

	// Loop through the option parameters array
	foreach ( $thsp_sections as $thsp_section ) {

		$thsp_section_fields = $thsp_section['fields'];

		foreach ( $thsp_section_fields as $thsp_field_key => $thsp_field_value ) {

			// Add an associative array key to the defaults array for each option in the parameters array
			if( isset( $thsp_field_value['setting_args']['default'] ) ) {
				$thsp_option_defaults[$thsp_field_key] = $thsp_field_value['setting_args']['default'];
			} else {
				$thsp_option_defaults[$thsp_field_key] = false;
			}

		}

	}

	// Return the defaults array
	return $thsp_option_defaults;

}
我只需要提到一件事-我们在’setting_args’数组中指定的清理回调函数。函数在extend.php中定义,并且仅通过wp_kses_post函数运行数据:
/**
 * Theme Customizer sanitization callback function
 */
function thsp_sanitize_cb( $input ) {

	return wp_kses_post( $input );

}
从这里到哪里?
现在,您可以在主题中使用此主题定制程序模板,您所需要做的就是从Github下载它,复制到主题的目录中,并包含来自functions.php的主文件,该文件具有100%的功能,足以满足大多数情况主题。
由于您的主题与“大多数主题”不同,因此下周我们将介绍如何使用其过滤器和动作挂钩来扩展样板。
我很想听听您如何看待可以改进或扩展的样板,因此请在评论中开除。

微信扫描二维码联系我们!
我们在微信上24小时期待你的声音
提供外贸路由器设备产品,轻松翻墙,解答:WP主题推荐,WP网站建设,Google SEO,百度SEO,专业服务器环境搭建等!
需要提供WordPress主题/插件的汉化服务可以随时联系我们!另外成品WordPress网站以及半成品WordPress网站建设,海外Google SEO优化托管服务,百度SEO优化托管服务,Centos/Debian服务器WP专用环境搭建,WP缓存服务器搭建,我们都是你的首选,拥有多年WP开源程序服务经验,我们一直在坚持客户体验,没有最好,只有更好!


